【Spring Boot】第13課-使用 Swagger UI 製作 API 文件與呼叫介面
本文最後更新於:2025-09-27
當後端的 RESTful API 要開放給其他人串接時,我們通常會整理出一份文件。當中會列出 API 的規格,包含 HTTP 方法、參數、request 與 response body 等。每個組織提供文件的方式可能不太一樣,但共同的問題是,若沒有持續地更新,就會發生遺漏或不準確的情形。
本文將介紹一個叫「Swagger UI」的工具,它能夠偵測程式專案中的 RESTful API,產生美觀的文件。這份文件可在網頁上供人觀看,甚至能直接用來呼叫,十分便利。
文末也會提及如何在有使用 Spring Security 的程式專案中使用這項工具。
本文的練習用專案,請點我。
一、Swagger UI 介紹
Swagger UI 是一個開源工具,能夠根據程式專案中定義的 RESTful API,產生文件網頁。若有人想要串接這些 API,可以前往像這樣的網頁進行「試用」。
下圖是中央氣象局開放資料平台的 API 文件。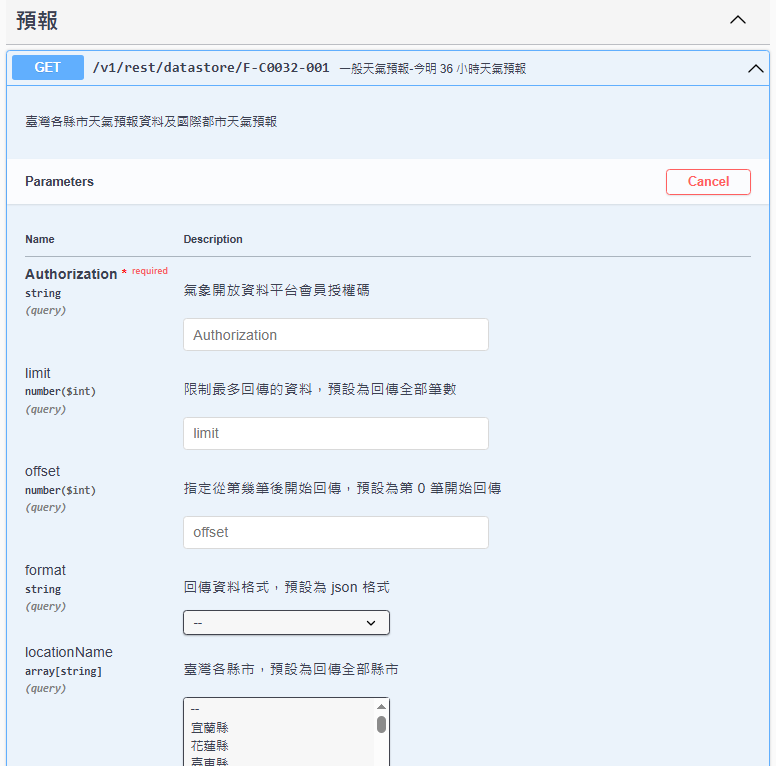
讀者可以看到,在使用時能夠填寫自己想要的參數,並呼叫 API。本文要產生的就是類似這樣子的文件。
二、範例專案介紹
在範例專案中,筆者已經在 Controller 準備好 RESTful API。
以下的 Product 類別,會同時作為 request 與 response body。
public class Product {
    private String id;
    private String name;
    private int price;

    public static Product of(String id, String name, int price) {
        var p = new Product();
        p.id = id;
        p.name = name;
        p.price = price;

        return p;
    }

	// getter, setter ...
}
以下的 SortDirection 類別,代表排序方向,可選擇遞增或遞減。
public enum SortDirection {
    ASC, DESC
}
以下是 Controller,包含 5 支 API,並且準備了測試資料。
@RestController
@RequestMapping(value = "/products", produces = MediaType.APPLICATION_JSON_VALUE)
public class ProductController {
    private static final Map<String, Product> productMap = new HashMap<>();

    static {
        var p1 = Product.of("101", "Coke", 30);
        var p2 = Product.of("102", "Hamburger", 60);
        var p3 = Product.of("103", "Sandwich", 50);
        Stream.of(p1, p2, p3).forEach(p -> productMap.put(p.getId(), p));
    }

    @GetMapping("/{id}")
    public ResponseEntity<Product> getProduct(@PathVariable("id") String id) {
        var product =  productMap.get(id);
        return product == null
                ? ResponseEntity.notFound().build()
                : ResponseEntity.ok(product);
    }

    @GetMapping
    public ResponseEntity<List<Product>> getProducts(
            @RequestParam(name = "sortField", required = false) String sortField,
            @RequestParam(name = "sortDirection", defaultValue = "ASC") SortDirection sortDirection
    ) {
        Comparator<Product> comparator = (p1, p2) -> 0;
        if ("name".equalsIgnoreCase(sortField)) {
            comparator = Comparator.comparing(p -> p.getName().toLowerCase());
        } else if ("price".equalsIgnoreCase(sortField)) {
            comparator = Comparator.comparing(Product::getPrice);
        }

        if (sortDirection == SortDirection.DESC) {
            comparator = comparator.reversed();
        }

        var products = productMap.values().stream()
                .sorted(comparator)
                .toList();
        return ResponseEntity.ok(products);
    }

    @PostMapping
    public ResponseEntity<Void> createProduct(@RequestBody Product product) {
		if (!StringUtils.hasText(product.getId())) {
            return ResponseEntity.badRequest().build();
        }

        var isIdExisting = productMap.containsKey(product.getId());
        if (isIdExisting) {
            return ResponseEntity.unprocessableEntity().build();
        }

        productMap.put(product.getId(), product);
        return ResponseEntity.ok().build();
    }

    @PutMapping("/{id}")
    public ResponseEntity<Void> updateProduct(
            @PathVariable("id") String id, @RequestBody Product product) {
        var isIdExisting = productMap.containsKey(id);
        if (!isIdExisting) {
            return ResponseEntity.notFound().build();
        }

        product.setId(id);
        productMap.put(product.getId(), product);

        return ResponseEntity.ok().build();
    }

    @DeleteMapping("/{id}")
    public ResponseEntity<Void> deleteProduct(@PathVariable("id") String id) {
        productMap.remove(id);
        return ResponseEntity.ok().build();
    }
}
這些 API 的規格,包含 URL 路徑上的參數、request 與 response body,以及 query string。另外也會回傳各種 HTTP 狀態碼。
三、引進 Swagger
請讀者在 pom.xml 檔案添加以下依賴。
<dependency>
    <groupId>org.springdoc</groupId>
    <artifactId>springdoc-openapi-starter-webmvc-ui</artifactId>
    <version>2.8.6</version>
</dependency>
啟動程式後,前往網址 http://localhost:8080/swagger-ui/index.html,就能看到 API 文件的網頁了!
若讀者的專案有引進 Spring Security,可能無法順利看見網頁,這部份會在第八節處理。
點開其中一個 API,除了能看到規格,透過右上方的「Try it out」按鈕,我們還能實際呼叫它。
下圖是呼叫 PUT 方法的 API,可自行填寫 URL 上的參數,以及 request body。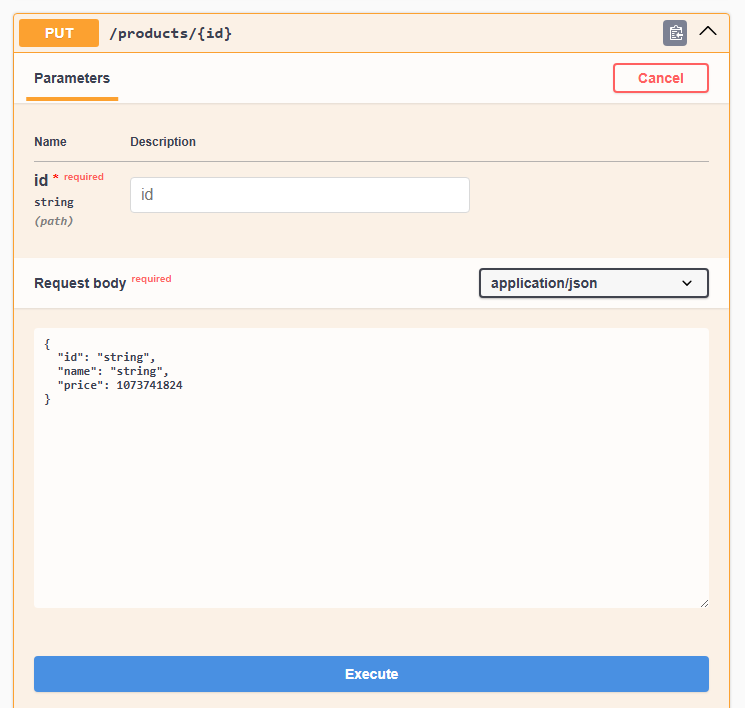
下圖是呼叫 GET 方法的 API,除了能看見 response 的資料,Swagger 也會自動組出 Curl 指令與完整 URL。
附帶一提,若讀者的程式專案有使用 Spring Security,那就需要在「Authorization」這個 request header,攜帶認證用的資料才能呼叫。這部份我們留到第八節再來處理。
四、說明 Controller
Swagger 會產生基本的文件內容,而函式庫也提供許多注解,幫助我們做更詳細的說明。
(一)說明 API
在 Controller 類別冠上 @Tag 注解,可以為 Controller 添加說明。
// ...
@Tag(name = "Product Controller", description = "產品增刪改查相關的 API")
public class ProductController {
	// ...
}
我們把 Controller 想像成 API 的「群組」。那麼 @Tag 注解的 name 參數就是定義群組的「標題」,字體較大。而 description 參數則定義說明文字,字體較小。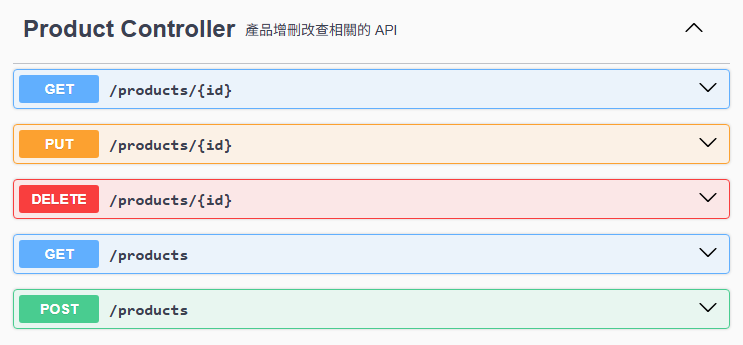
在 API 處理方法冠上 @Operation 注解,可以為 API 添加說明。
// ...
public class ProductController {
// ...
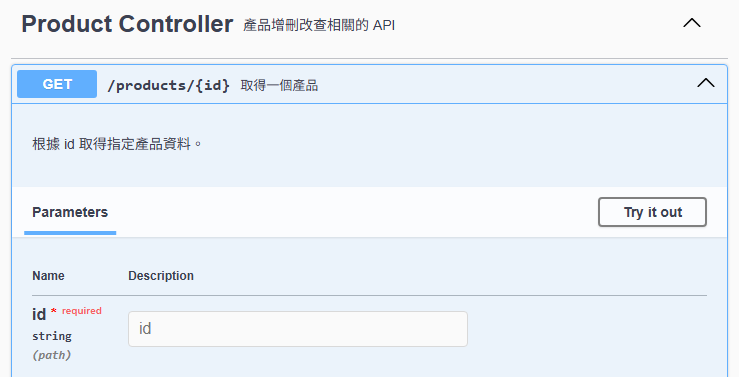
@Operation(summary = "取得一個產品", description = "根據 id 取得指定產品資料。")
@GetMapping("/{id}")
public ResponseEntity<Product> getProduct(@PathVariable("id") String id) {
// ...
}
@Operation(summary = "取得多個產品", description = "根據給予的參數(如排序)取得多筆產品資料。")
@GetMapping
public ResponseEntity<List<Product>> getProducts(
@RequestParam(name = "sortField", required = false) String sortField,
@RequestParam(name = "sortDirection", defaultValue = "ASC") SortDirection sortDirection
) {
// ...
}
@Operation(summary = "建立產品", description = "建立一筆產品資料。")
@PostMapping
public ResponseEntity<Product> createProduct(@RequestBody Product product) {
// ...
}
@Operation(summary = "更新產品", description = "更新指定 id 的產品資料。Request body 中的 id 會被忽略。")
@PutMapping("/{id}")
public ResponseEntity<Void> updateProduct(
@PathVariable("id") String id, @RequestBody Product product) {
// ...
}
@Operation(summary = "刪除產品", description = "刪除指定 id 的產品資料。")
@DeleteMapping("/{id}")
public ResponseEntity<Void> deleteProduct(@PathVariable("id") String id) {
// ...
}
}該注解的 summary 參數,可簡要說明 API 的用途。而 description 參數,可做詳細一點的描述,點開 API 規格便能看到。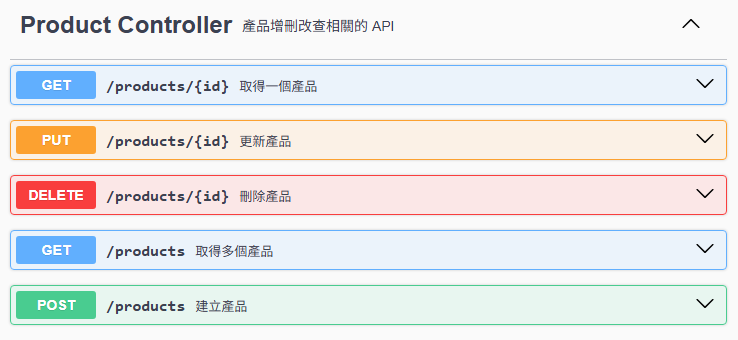
(二)說明 HTTP 狀態碼
在 API 處理方法冠上 @ApiResponses 注解,並傳入一到多個 @ApiResponse 注解,可說明該 API 會回傳的 HTTP 狀態碼。
// ...
public class ProductController {

	// ...
    @ApiResponses(value = {
            @ApiResponse(responseCode = "200", description = "成功回傳產品資料"),
            @ApiResponse(responseCode = "404", description = "找不到該產品", content = @Content)
    })
    @GetMapping("/{id}")
    public ResponseEntity<Product> getProduct(@PathVariable("id") String id) {
		// ...
	}

	// ...
    @ApiResponses(value = {
            @ApiResponse(responseCode = "200", description = "成功回傳產品資料")
    })
    @GetMapping
    public ResponseEntity<List<Product>> getProducts(
            @RequestParam(name = "sortField", required = false) String sortField,
            @RequestParam(name = "sortDirection", defaultValue = "ASC") SortDirection sortDirection
    ) {
		// ...
	}

	// ...
	@ApiResponses(value = {
            @ApiResponse(responseCode = "200", description = "成功建立產品資料"),
            @ApiResponse(responseCode = "400", description = "產品資料不合理", content = @Content),
            @ApiResponse(responseCode = "422", description = "已有相同 id 的產品資料", content = @Content)
    })
    @PostMapping
    public ResponseEntity<Void> createProduct(@RequestBody Product product) {
		// ...
	}

	// ...
	@ApiResponses(value = {
            @ApiResponse(responseCode = "200", description = "成功更新產品資料"),
            @ApiResponse(responseCode = "400", description = "產品資料不合理", content = @Content),
            @ApiResponse(responseCode = "404", description = "找不到該產品", content = @Content)
    })
    @PutMapping("/{id}")
    public ResponseEntity<Void> updateProduct(
			@PathVariable("id") String id, @RequestBody Product product) {
		// ...
	}

	// ...
	@ApiResponses(value = {
            @ApiResponse(responseCode = "200", description = "成功刪除產品資料", content = @Content)
    })
    @DeleteMapping("/{id}")
    public ResponseEntity<Void> deleteProduct(@PathVariable("id") String id) {
		// ...
	}
}
範例中用到的參數,介紹如下。
| 參數 | 說明 |
|---|---|
| responseCode | HTTP 狀態碼。 |
| description | 說明狀態碼。 |
| content | 提供 response body 的結構。 |
關於 content 參數,若 API 沒有 response body,可提供「無參數的」@Content 注解。否則在 Swagger 上顯示的 response body,預設會是方法的回傳值。
下圖是 Swagger 上呈現的樣子。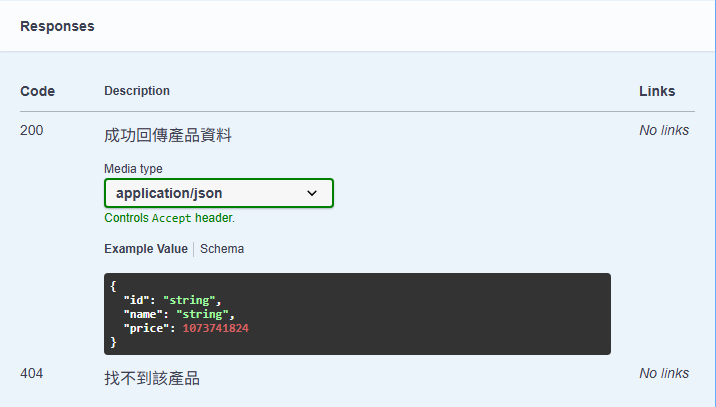
若讀者想在不同的 HTTP 狀態碼提供不同的 response body,那就需要定義好 @Content 注解,這部份我們將在第五節處理。
五、展示 response body 的結構
使用 @ApiResponse 注解,除了能對 API 會回傳的 HTTP 狀態碼做說明,也能提供 response body 的結構。
本節讓我們參考第 3.3 課文末的情境。那篇文章透過 @Valid 注解,在 request body 的資料不合規定時,回傳 HTTP 400 狀態碼,並將錯誤訊息整理成 response body。
(一)回傳物件
若想讓 API 回傳的 response body 是一個物件,如下。
public class BatchValidationFailInfo {
    private List<String> invalidFields;

	// getter, setter ...
}
將 @Content 注解傳入 @ApiResponse 注解的 content 參數,我們可進一步定義這個狀態碼,要回傳的 response body 是哪一個類別。
// ...
public class ProductController {

	// ...
    @ApiResponses(value = {
            // ...
            @ApiResponse(responseCode = "400", description = "產品資料不合理",
                    content = @Content(schema = @Schema(implementation = BatchValidationFailInfo.class)))
    })
    @PostMapping
    public ResponseEntity<Void> createProduct(@RequestBody Product product) {
        // ...
    }

	// ...
    @ApiResponses(value = {
            // ...
            @ApiResponse(responseCode = "400", description = "產品資料不合理",
                    content = @Content(schema = @Schema(implementation = BatchValidationFailInfo.class)))
    })
    @PutMapping("/{id}")
    public ResponseEntity<Void> updateProduct(
            @PathVariable("id") String id, @RequestBody Product product) {
        // ...
    }
}
此處將 @Schema 注解傳入 schema 參數,最後將類別傳入 implementation 參數即可。
下圖是 Swagger 上呈現的樣子,在對應 HTTP 狀態碼的區塊可看見規格。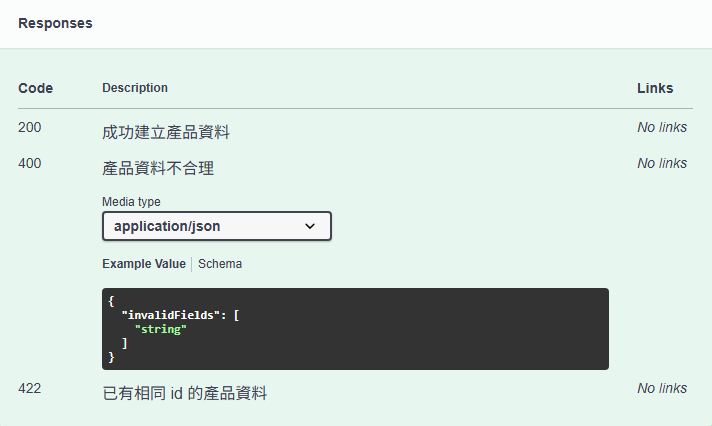
(二)回傳 List
若 API 回傳的 response body 是多個物件組成的 List,物件類別如下。
public class ValidationFailInfo {
    private String field;
    private Object value;
    private String message;

	// getter, setter ...
}
透過 @Content 注解的 array 參數,Swagger 會將 response body 的規格變成陣列。
// ...
public class ProductController {

	// ...
    @ApiResponses(value = {
            // ...
            @ApiResponse(responseCode = "400", description = "產品資料不合理",
                    content = @Content(array = @ArraySchema(schema = @Schema(implementation = ValidationFailInfo.class)))),
    })
    @PostMapping
    public ResponseEntity<Void> createProduct(@RequestBody Product product) {
        // ...
    }

	// ...
    @ApiResponses(value = {
            // ...
            @ApiResponse(responseCode = "400", description = "產品資料不合理",
                    content = @Content(array = @ArraySchema(schema = @Schema(implementation = ValidationFailInfo.class)))),
    })
    @PutMapping("/{id}")
    public ResponseEntity<Void> updateProduct(
            @PathVariable("id") String id, @RequestBody Product product) {
        // ...
    }
}
下圖是 Swagger 上呈現的樣子。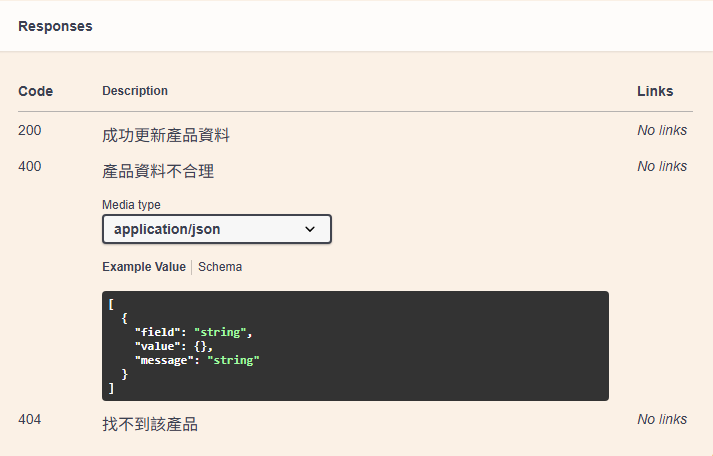
關於 request body 資料驗證的程式實作,並非本文重點。有興趣的讀者可參考文末附上的完成後專案。
六、說明 URL 上的參數
(一)說明路徑參數
使用 @Parameter 注解,可說明 API 路徑上的參數,例如 /products/{id} 路徑中的 {id}。
// ...
public class ProductController {

	// ...
	@GetMapping("/{id}")
    public ResponseEntity<Product> getProduct(
            @Parameter(description = "產品 id", example = "101", required = true)
            @PathVariable("id") String id
    ) {
		// ...
	}

	// ...
	@PutMapping("/{id}")
    public ResponseEntity<Void> updateProduct(
            @Parameter(description = "產品 id", example = "101", required = true)
            @PathVariable("id") String id,

            @RequestBody Product product
    ) {
		// ...
	}

	// ...
	@DeleteMapping("/{id}")
    public ResponseEntity<Void> deleteProduct(
            @Parameter(description = "產品 id", example = "101", required = true)
            @PathVariable("id") String id
    ) {
		// ...
	}
}
範例中用到的參數,介紹如下。
| 參數 | 說明 |
|---|---|
| description | 提供說明文字。 |
| example | 提供範例值。 |
| requiredMode | 定義是否必填。呼叫 API 時,若必填欄位未給值,Swagger 會跳出提示訊息。 |
下圖是 Swagger 上呈現的樣子。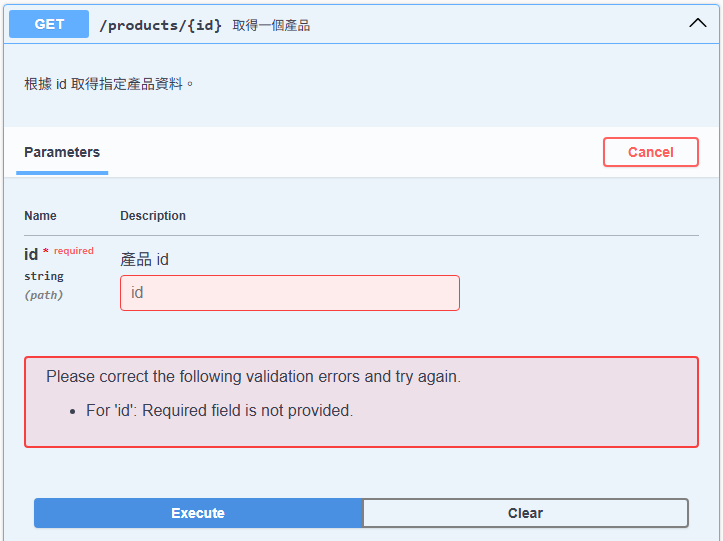
在畫面中,可看見欄位旁有必填的標示。若呼叫 API 時未填,Swagger 會跳出提示訊息。
(二)說明 query string
@Parameter 注解也能用來說明 query string。
// ...
public class ProductController {

	// ...
	@GetMapping
    public ResponseEntity<List<Product>> getProducts(
            @Parameter(description = "排序欄位", example = "price")
            @RequestParam(name = "sortField", required = false)
            String sortField,

            @Parameter(description = "排序方向")
            @RequestParam(name = "sortDirection", defaultValue = "ASC")
            SortDirection sortDirection
    ) {
		// ...
	}
}
下圖是 Swagger 上呈現的樣子。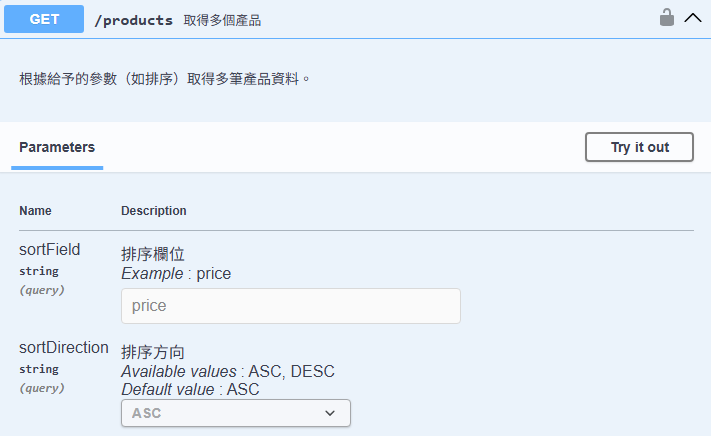
然而,如果接收 query string 時是使用 @ModelAttribute 注解,將接收到的值通通整理成一個物件,就不能透過 @Parameter 注解來說明了。要採取第七節與 request 和 response body 相同的方式。
七、說明 request 與 response Body
使用 @Schema 注解,可以在 request body、response body 與 query string 的類別,說明各個欄位。
public class Product {

    @Schema(description = "產品 id;建立資料時為必填,更新資料時會被忽略", example = "101")
    private String id;

    @Schema(description = "產品名稱", example = "Juice", requiredMode = Schema.RequiredMode.REQUIRED)
    private String name;

    @Schema(description = "價格", example = "10", requiredMode = Schema.RequiredMode.REQUIRED)
    private int price;

	// getter, setter ...
}
public class BaseRequestParameter {
@Schema(description = "排序欄位", example = "price")
private String sortField;
@Schema(description = "遞增或遞減", example = "ASC")
private SortDirection sortDirection;
// getter, setter ...
}範例中用到的參數,介紹如下。
| 參數 | 說明 |
|---|---|
| description | 提供說明文字。 |
| example | 提供範例值。 |
| requiredMode | 定義是否必填。但呼叫 API 時,Swagger 不會跳出未填的提示訊息。 |
下圖是 Swagger 上呈現的樣子,在「Request body」的區塊,切換到「Schema」頁籤,便可看見規格。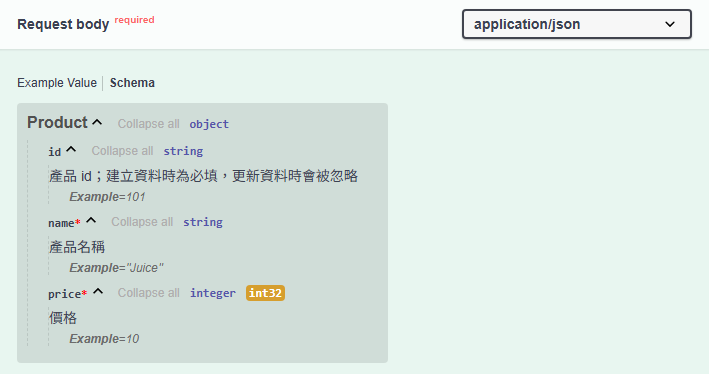
@Schema 注解還提供了其他參數,方便我們給欄位進行更多的說明,舉例如下,讀者可自行探索。
| 參數 | 說明 |
|---|---|
maximum、minimum |
說明最大、最小值。 |
maxLength、minLength |
說明最大、最小長度。 |
但呼叫 API 時,Swagger 並不會進行資料驗證,所以不會像第五節那樣跳出提示訊息。
八、與 Spring Security 共處
(一)開放存取 Swagger 頁面
若讀者的程式專案有使用 Spring Security,可能會發現無法正常進入 Swagger 的頁面。這是因為 Spring Security 預設會保護所有的 API。
為了開放存取 Swagger 的頁面,我們需要在 Spring Security 的配置類別,進行以下設定。
import org.springframework.security.config.annotation.web.configurers.AbstractHttpConfigurer;

@Configuration
@EnableWebSecurity
public class SecurityConfig {
    private static final String[] SWAGGER_URL_AUTH_WHITELIST = {
            "/swagger-resources",
            "/swagger-resources/**",
            "/configuration/ui",
            "/configuration/security",
            "/swagger-ui.html",
            "/webjars/**",
            "/v3/api-docs/**",
            "/api/public/**",
            "/api/public/authenticate",
            "/actuator/*",
            "/swagger-ui/**"
    };

    @Bean
    public SecurityFilterChain securityFilterChain(HttpSecurity httpSecurity) throws Exception {
        return httpSecurity
                .authorizeHttpRequests(requests -> requests
                        .requestMatchers(SWAGGER_URL_AUTH_WHITELIST).permitAll()
                        .anyRequest().authenticated()
                )
                .csrf(AbstractHttpConfigurer::disable)
                .build();
    }
}
此處是將 Swagger 相關的 URL 設定成允許所有人存取。至於其他 Controller 中的 API,就維持保護起來。
(二)開放 HTTP Basic 認證
若讀者想存取受到 Spring Security 保護的 API,就必須在「Authorization」這個 request header 攜帶資料進行認證。
本段會以 HTTP Basic 認證為例,在 Swagger 的畫面上顯示填寫帳密的地方。
請先在 Spring Security 的配置類別,開放 HTTP Basic 認證,並準備一個使用者帳號,做為測試之用。此處的帳號為「user」,密碼為「123」。
@Configuration
@EnableWebSecurity
public class SecurityConfig {
	// ...

    @Bean
    public SecurityFilterChain securityFilterChain(HttpSecurity httpSecurity) throws Exception {
        return httpSecurity
                .authorizeHttpRequests(requests -> requests
                        .requestMatchers(SWAGGER_URL_AUTH_WHITELIST).permitAll()
                        .anyRequest().authenticated()
                )
                .csrf(AbstractHttpConfigurer::disable)
                .httpBasic(Customizer.withDefaults())
                .build();
    }

    @Bean
    public UserDetailsService inMemoryUserDetailManager() {
        UserDetails user = User
                .withUsername("user")
                .password("{noop}123")
                .build();
        return new InMemoryUserDetailsManager(List.of(user));
    }
}
接著再建立 OpenAPI 的元件,它會被 Swagger 的函式庫掃描,並將配置的設定反應在文件上。
@Configuration
public class SwaggerConfig {

    @Bean
    public OpenAPI openAPI() {
        Info info = new Info()
                .title("My Spring Boot API Document")
                .version("1.0.0");

        var basicSchemeName = "HTTP Basic Auth";
        var securityRequirement = new SecurityRequirement()
                .addList(basicSchemeName);
        var components = new Components()
                .addSecuritySchemes(basicSchemeName,
                        new SecurityScheme()
                                .name(basicSchemeName)
                                .type(SecurityScheme.Type.HTTP)
                                .scheme("basic"));

        return new OpenAPI()
                .info(info)
                .addSecurityItem(securityRequirement)
                .components(components);
    }
}
在上面的範例程式中,先是定義了文件的標題,接著再開啟 HTTP Basic 認證的功能。
下圖是 Swagger 上呈現的樣子。可看見文件標題變成我們自己定義的。而且還出現了「Authorize」按鈕,點下去可填寫帳密。
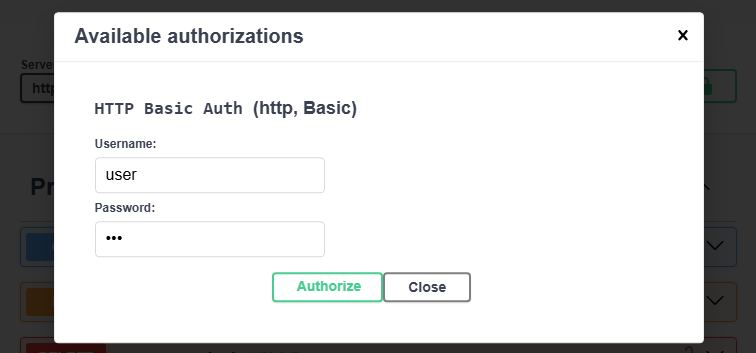
填寫完帳密後,再按下「Authorize」按鈕。之後發出 request 時,Swagger 就會自動攜帶 Authorization 這個 request header,並加上「Basic」的前綴。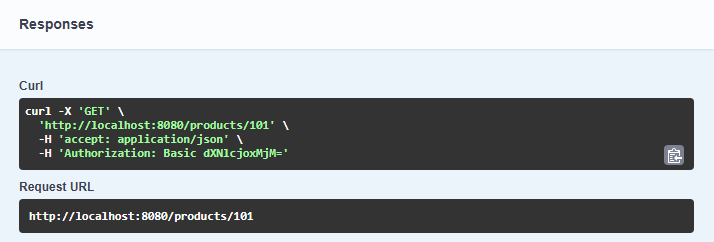
(三)開放 JWT 認證
仿照前面的做法,以下的範例程式是額外配置 JWT 認證的功能。
@Configuration
public class SwaggerConfig {

    @Bean
    public OpenAPI openAPI() {
        Info info = new Info()
                .title("My Spring Boot API Document")
                .version("1.0.0");

		// ...
        var jwtSchemeName = "JWT Auth";

        var securityRequirement = new SecurityRequirement()
                // ...
                .addList(jwtSchemeName);

        var components = new Components()
				// ...
                .addSecuritySchemes(jwtSchemeName,
                        new SecurityScheme()
                                .name(jwtSchemeName)
                                .type(SecurityScheme.Type.HTTP)
                                .scheme("bearer")
                                .bearerFormat("JWT"));

        return new OpenAPI()
                .info(info)
                .addSecurityItem(securityRequirement)
                .components(components);
    }
}
重新打開 Swagger 文件,讀者便能看到填寫 JWT 的地方。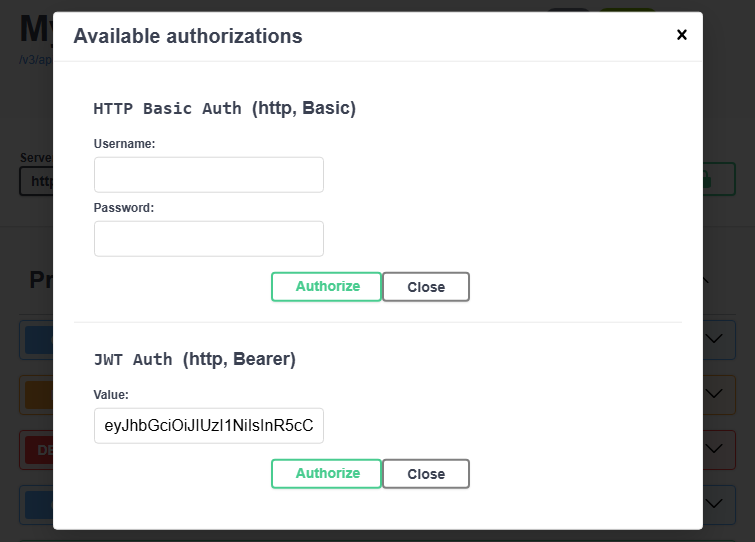
發出 request 時,Swagger 也會自動攜帶 request header,並加上「Bearer」的前綴。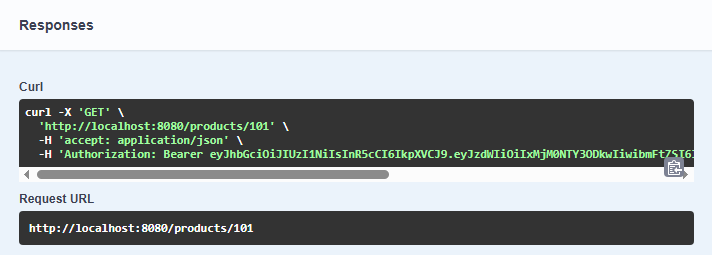
本文的完成後專案,請點我。
上一課:【Spring Boot】第12.6課-實作 Spring Security 的認證 Filter(以 JWT 為例)