【Spring Boot】第10.1課 - 使用 MockMvc 進行 API 整合測試
本文最後更新於:2025-06-20
在先前文章的練習中,若要進行測試,都是先啟動程式,再使用 Postman 這項工具呼叫 API,隨後確認結果。
但隨著功能越來越多,手動測試會非常麻煩。因此本文將利用 Spring Boot 提供的 MockMvc,幫助我們以程式化的方式進行測試。
一、測試的概念
(一)為什麼要寫測試
測試的目的是確認功能可以正常運作,例如先前的文章對後端 API 進行測試時,會手動操作 Postman 這項工具。然而逐一測試會很費時,因此我們可以透過撰寫「測試程式」來自動化。
每當開發新功能,或修復 Bug 時,我們可針對該次的改動撰寫測試程式,並與舊有的測試一起執行。除了證明該次交付的程式能達成目的,也要確保不會影響現有的功能,讓 bug 能盡早被發現。
根據測試的範圍,可分為以下幾種。
- 單元測試(unit test):測試的對象是程式中的一個方法(method)。若該方法會使用到其他依賴的元件或外部服務(如資料庫),這部份會透過「模擬」(mock)的手法來處理,而不是真的進去執行。
- 整合測試(integration test):與單元測試相比,整合測試會真正去使用所依賴的元件或服務,確保整體運作上沒有問題。
- 端對端測試(end to end test):就像使用者操作前端畫面那樣。範圍包含前端發送 HTTP request 到後端,收到 response 後再驗證畫面上的結果。
本文所要介紹的是整合測試,這會利用 Spring Boot 提供的 MockMvc。它和 Postman 一樣,可以指定 HTTP 方法與 API 路徑,並攜帶 request header、body 與 query string。
(二)寫測試的缺點
雖說撰寫測試程式,能夠幫助我們在未來更有效率地測試,但也要權衡利弊:
- 寫測試畢竟也是一種寫程式的動作,有時花費的時間可能還會大於開發業務邏輯的時間呢!當工作時程緊湊,可能會沒時間寫。除非團隊能將測試時間納人開發時程,否則若硬要做,勢必會很有壓力。
- 有些團隊會有 code review(程式碼審查)的流程,同事得多花時間看這些測試程式。
- 未來需求如果改變,測試程式也要隨之修改,要多花額外的時間來維護。
基於這些工作上可能遇到的情況,讀者不妨自己斟酌測試的量。比方說優先測試重要的情境,行有餘力再考慮其他的。
二、程式專案介紹
本節筆者將介紹程式專案,該專案在 Controller 提供了 RESTful API,以便進行測試。
以下是產品資料的類別,包含 id、名稱與價格。
public class Product {
    private String id;
    private String name;
    private int price;

    // getter, setter ...
}
以下類別是用來在 Controller 接收 query string,包含排序的欄位與方向。
public class ProductRequestParameter {
    private String sortField;
    private String sortDirection;

    // getter, setter ...
}
以下是儲存產品資料的 repository 介面,提供取得、新增與刪除資料的方法。至於其他 default 方法,則是用來產生 id 和建立排序比較器。
import java.util.UUID;

public interface IProductRepository {
    Product findById(String id);
    List<Product> findAll(ProductRequestParameter param);
    Product insert(Product product);
    void deleteAll();

    default String generateId() {
        return UUID.randomUUID().toString();
    }

    default Comparator<Product> getSortComparator(ProductRequestParameter param) {
        Comparator<Product> comparator;
        if ("name".equalsIgnoreCase(param.getSortField())) {
            comparator = Comparator.comparing(p -> p.getName().toLowerCase());
        } else if ("price".equalsIgnoreCase(param.getSortField())) {
            comparator = Comparator.comparing(Product::getPrice);
        } else {
            comparator = (p1, p2) -> 0;
        }

        if ("desc".equalsIgnoreCase(param.getSortDirection())) {
            comparator = comparator.reversed();
        }

        return comparator;
    }
}
本文並未串接真實的資料庫。以下的 repository 實作,是用 Map 資料結構來儲存資料。第八節還會準備以 List 來儲存的實作。
public class MapProductRepository implements IProductRepository {
    private final Map<String, Product> productMap = new HashMap<>();

    public Product findById(String id) {
        return productMap.get(id);
    }

    public List<Product> findAll(ProductRequestParameter param) {
        var comparator = getSortComparator(param);
        return productMap.values()
                .stream()
                .sorted(comparator)
                .toList();
    }

    public Product insert(Product product) {
        product.setId(generateId());
        productMap.put(product.getId(), product);

        return product;
    }

    public void deleteAll() {
        productMap.clear();
    }
}
@Configuration
public class RepositoryConfig {
@Bean
public IProductRepository productRepository() {
return new MapProductRepository();
}
}最後是 Controller,提供取得一筆、取得多筆,和新增資料的 API。
@RestController
@RequestMapping(value = "/products", produces = MediaType.APPLICATION_JSON_VALUE)
public class ProductController {

    @Autowired
    private IProductRepository productRepository;

    @GetMapping("/{id}")
    public ResponseEntity<Product> getOne(@PathVariable("id") String id) {
        var product = productRepository.findById(id);
        return product == null
                ? ResponseEntity.notFound().build()
                : ResponseEntity.ok(product);
    }

    @GetMapping
    public ResponseEntity<List<Product>> getMany(@ModelAttribute ProductRequestParameter param) {
        var products = productRepository.findAll(param);
        return ResponseEntity.ok(products);
    }

    @PostMapping
    public ResponseEntity<Void> create(@RequestBody Product product) {
        if (product.getName() == null || product.getPrice() < 0) {
            return ResponseEntity.badRequest().build();
        }

        productRepository.insert(product);

        var uri = ServletUriComponentsBuilder
                .fromCurrentRequestUri()
                .path("/{id}")
                .build(Map.of("id", product.getId()));
        return ResponseEntity.created(uri).build();
    }
}
取得一筆資料時,若找不到,會回傳 404 狀態碼;新增資料時,若名稱與價格不合法,會回傳 400 狀態碼。
三、開始撰寫測試
(一)準備測試類別
準備好程式專案和 RESTful API 後,就能準備測試了。
假設讀者這次練習,是在「com.example.demo」的 package 下寫程式,那麼請在程式專案的「src/test/java/com/example/demo」路徑下,建立一個類別,專門用來撰寫測試程式。
@SpringBootTest
@AutoConfigureMockMvc
class ProductTests {

    @Autowired
    private MockMvc mockMvc;

    @Autowired
    private IProductRepository productRepository;

    private Product insertProduct(String name, int price) {
        var product = new Product();
        product.setName(name);
        product.setPrice(price);

        return productRepository.insert(product);
    }

    // TODO
}
此類別冠上了 2 個注解。@SpringBootTest 會在執行測試時,啟動 Spring Boot 環境,所以我們可在此注入元件。@AutoConfigureMockMvc 能自動建立 MockMvc 的元件,我們會利用它來對 Controller 發出 request。
另外還提供了一個用來在 repository 新增產品測試資料的方法。
(二)指定 API 路徑並發出 request
以下是一支測試程式,冠上了 @Test 注解。其情境是透過產品 id 取得資料。
import org.junit.jupiter.api.Test;
import org.springframework.test.web.servlet.RequestBuilder;
import static org.springframework.test.web.servlet.result.MockMvcResultHandlers.print;
import static org.springframework.test.web.servlet.result.MockMvcResultMatchers.jsonPath;
import static org.springframework.test.web.servlet.result.MockMvcResultMatchers.status;

@SpringBootTest
@AutoConfigureMockMvc
class ProductTests {

    @Autowired
    private MockMvc mockMvc;

    @Test
    void testGetOneProduct() throws Exception {
        Product product = insertProduct("Hamburger", 50);

        String apiPath = "/products/" + product.getId();
        RequestBuilder requestBuilder = MockMvcRequestBuilders.get(apiPath);

        mockMvc.perform(requestBuilder)
                .andDo(print())
                .andExpect(status().isOk())
                .andExpect(jsonPath("$.id").value(product.getId()))
                .andExpect(jsonPath("$.name").value(product.getName()))
                .andExpect(jsonPath("$.price").value(product.getPrice()));
    }

    // ...
}
首先在 repository 新增一筆資料。
然後透過 MockMvcRequestBuilders 的方法構建 request 內容,此處呼叫 get 方法指定 GET /products/{id} 這支 API,並得到了 RequestBuilder 介面的物件。最後呼叫 MockMvc 的 perform 方法,即可發出 request。
隨後我們可進行一些後續的動作。使用 andExpect 方法,可傳入各式各樣的規則來驗證 response。比方說 status() 方法可驗證 HTTP 狀態碼,有 200(OK)、201(Created)、404(Not Found)等許多選項可用。
使用 jsonPath().value() 方法,可驗證 response body 的欄位值。jsonPath 方法的欄位路徑寫法,會以「$」符號作為第一層,並以「.」符號,指向該層的欄位。更深層的欄位,就以「.」繼續串接欄位名稱。而 value 方法則傳入預期的欄位值。
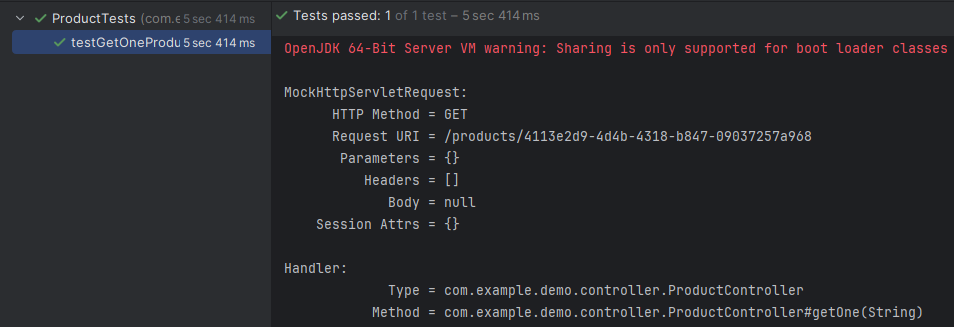
使用 andDo(print()) 方法,可以將 request 和 response 的資訊印在 Console 窗格。
(三)執行測試
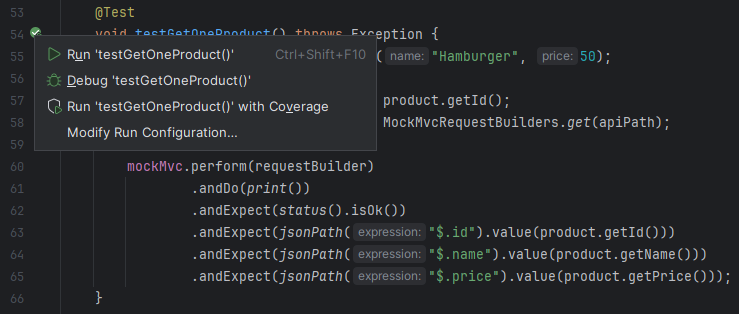
撰寫好測試程式後,左鍵按下方法名稱旁邊的綠色圖案即可執行,有 Run 和 Debug 兩個選項。
執行完後,在左下方窗格可看到測試方法名稱旁的綠色勾勾,代表通過。而黃色圖案代表驗證失敗,紅色代表發生例外。在右方的 Console 窗格,可看到印出的 request 與 response 資訊。

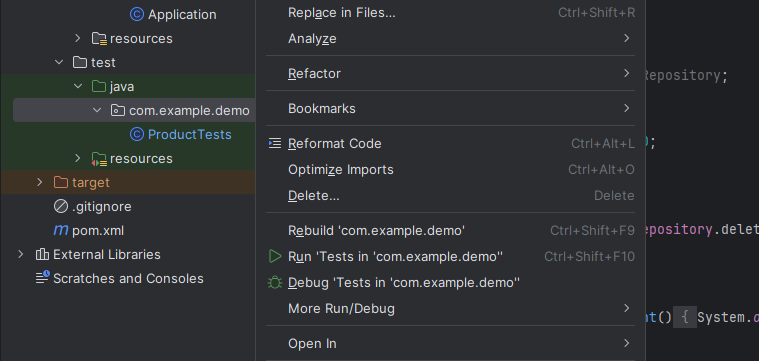
若讀者想一次執行多個測試,可以左鍵點擊測試類別名稱旁的綠色圖案。或者在專案瀏覽窗格中,右鍵點擊含有測試類別的資料夾。一樣都有 Run 和 Debug 可選擇。
四、測試執行前與後的處理
在撰寫下一支測試程式前,讀者要先知道一件事:每個測試情境所用的資料都是獨立的,不應該被其他殘留資料干擾。
舉例來說,下一節我們會撰寫取得多個產品的測試。若沒有將 repository 的資料清空,那麼 API 回傳的資料筆數可能就會不如預期。
本節將介紹如何在測試程式執行前與後,進行想要的動作。根據上述的例子,請宣告一個方法,用來清空 repository。
@SpringBootTest
@AutoConfigureMockMvc
class ProductTests {

    @BeforeEach
    public void clearRepo() {
        productRepository.deleteAll();
    }

    // ...
}
該方法冠上了 @BeforeEach 注解,代表會在每支測試程式執行前執行。另外也有 @AfterEach 注解可用。要注意的是,方法必須宣告為 public。
我們也能以測試類別為單位,在所有測試程式執行前與後,做想要的事情。下面的例子,是在 repository 新增產品時進行計數,並在最後印出該測試類別新增的產品數量。
@SpringBootTest
@AutoConfigureMockMvc
class ProductTests {
    private static int productCount = 0;

    @AfterAll
    public static void printProductCount() {
        System.out.println("Inserted product amount: " + productCount);
    }

    private Product insertProduct(String name, int price) {
        // ...

        productCount++;
        return productRepository.insert(product);
    }

    // ...
}
該方法冠上了 @AfterAll 注解,代表會在所有測試執行完才執行。另外也有 @BeforeAll 注解可用。要注意的是,方法必須宣告為 public static。
五、攜帶 query string 與驗證陣列元素
以下的測試情境,是攜帶 query string,對產品資料做排序。
@SpringBootTest
@AutoConfigureMockMvc
class ProductTests {
    // ...

    @Test
    void testSortProductsByPrice() throws Exception {
        Product product1 = insertProduct("Hamburger", 50);
        Product product2 = insertProduct("Coke", 20);
        Product product3 = insertProduct("Sandwich", 40);

        RequestBuilder requestBuilder = MockMvcRequestBuilders
                .get("/products")
                .param("sortField", "price")
                .param("sortDirection", "desc");

        mockMvc.perform(requestBuilder)
                .andExpect(jsonPath("$", hasSize(3)))
                .andExpect(jsonPath("$[0].id").value(product1.getId()))
                .andExpect(jsonPath("$[1].id").value(product3.getId()))
                .andExpect(jsonPath("$[2].id").value(product2.getId()));
    }
}
使用 MockMvcRequestBuilders 的 param 方法,可傳入 query string。第一個參數為名稱,第二個參數為值。
發出 request 後,可透過 hasSize 方法,驗證一下 response 中的資料筆數。
若要對陣列元素的欄位值做驗證,在 jsonPath 方法中,可透過「欄位名稱 + 中括號 + 數字」,來表示指定位置的元素。此處由於 response body 本身就是陣列,所以直接在「$」後方寫上中括號。
六、將 response 轉換成物件再驗證
除了透過 andExpect 方法來驗證欄位值,也可以將 response body 轉換為物件,再進行想要的驗證。當我們不在意資料的先後順序,這種手法就派得上用場。
而且還有另一項好處,就是當欄位名稱變更,也不必特地回來修改當初傳入 jsonPath 方法的欄位路徑字串,畢竟開發工具是可以連動更改 getter 方法。
以下的測試情境,一樣是取得多筆產品資料,但重點是不排序。
@SpringBootTest
@AutoConfigureMockMvc
class ProductTests {
    private final static ObjectMapper objectMapper = new ObjectMapper();

    @Test
    void testGetManyProduct() throws Exception {
        Product product1 = insertProduct("Hamburger", 50);
        Product product2 = insertProduct("Coke", 20);

        RequestBuilder requestBuilder = MockMvcRequestBuilders.get("/products");
        MvcResult mvcResult = mockMvc.perform(requestBuilder).andReturn();
        MockHttpServletResponse httpResponse = mvcResult.getResponse();

        assertEquals(HttpStatus.OK.value(), httpResponse.getStatus());

        String responseBody = httpResponse.getContentAsString();
        List<Product> actualProducts = objectMapper.readValue(responseBody, new TypeReference<List<Product>>() {});
        List<String> actualIds = actualProducts.stream()
                .map(Product::getId)
                .toList();
        List<String> expectedIds = List.of(product1.getId(), product2.getId());

        assertTrue(actualIds.containsAll(expectedIds));
        assertTrue(expectedIds.containsAll(actualIds));
    }
}
透過 MockMvc 發送 request 後,接續呼叫 andReturn 與 getResponse 方法,可得到 MockHttpServletResponse 物件。
我們可從 MockHttpServletResponse 物件取得 HTTP 狀態碼、header 與 body 等資料。其中,透過 getContentAsString 方法,可得到 body 的 JSON 字串。
接下來會用到一個叫 ObjectMapper 的物件,它能夠將 JSON 字串與指定類别的物件互相轉換。此處透過它的 readValue 方法,將 response body 轉換成 List<Product>。
最後將實際結果的產品 id 收集起來,確認是否如預期。
附帶一提,使用 ObjectMapper 時,若想將 JSON 字串轉換成帶有泛型的 List 或 Map 時,再搭配使用 TypeReference 就好。一般情況可直接傳入類別名稱,如 objectMapper.readValue(responseBody, Product.class)。
七、攜帶 request body 與 header
本節的測試情境是新增產品資料,這會攜帶 request body 與 header。
@SpringBootTest
@AutoConfigureMockMvc
class ProductTests {
    // ...

    @Test
    void testCreateProduct() throws Exception {
        Product productRequest = new Product();
        productRequest.setName("Coke");
        productRequest.setPrice(20);
        String requestBody = objectMapper.writeValueAsString(productRequest);

        RequestBuilder requestBuilder = MockMvcRequestBuilders
                .post("/products")
                .content(requestBody)
                .contentType(MediaType.APPLICATION_JSON);
        MockHttpServletResponse httpResponse = mockMvc.perform(requestBuilder)
                .andExpect(status().isCreated())
                .andReturn()
                .getResponse();

        String location = httpResponse.getHeader(HttpHeaders.LOCATION);
        assertNotNull(location);

        String productId = location.substring(location.lastIndexOf("/") + 1);
        Product resultProduct = productRepository.findById(productId);

        assertEquals(productRequest.getName(), resultProduct.getName());
        assertEquals(productRequest.getPrice(), resultProduct.getPrice());
    }
}
首先建立一個產品物件,用途是讓 ObjectMapper 將其解析成字串,做為 request body。
構建 request 時,透過 MockMvcRequestBuilders 的 content 方法,可傳人 request body 的字串。另外也要透過 header 方法,在 header 給予「Content-Type」欄位值,代表資料格式。
發出 request 後,我們會想要知道儲存到 repository 中的資料是否如預期。此處可從 response header 取出「Location」欄位值,擷取出產品 id,隨後從 repository 查詢出來進行驗證。
八、測試專屬的配置檔
筆者在第 6 課介紹過 application.properties 配置檔,裡面可以填寫關於資料庫連線、郵件服務等各種設定值。
在進行整合測試時,建議使用獨立的配置檔,而不要與正式環境使用同一個。一來可以專注於當下的測試資料,不會受到其他資料干擾。二來也能避免測試程式沒寫好,誤刪或留下了髒資料。
請讀者在程式專案的「src\test\resources」路徑下,也準備一個 application.properties 配置檔。
product-repository.storage=list別忘了在正式環境的配置檔也添加相同 key 的設定值。
product-repository.storage=map本節會實作一個用 List 資料結構來儲存產品資料的 repository。這個自定義的設定值,就是為了讓不同環境存取不同的服務。
public class ListProductRepository implements IProductRepository {
    private final List<Product> productList = new ArrayList<>();

    public Product findById(String id) {
        return productList.stream()
                .filter(p -> p.getId().equals(id))
                .findFirst()
                .orElse(null);
    }

    public List<Product> findAll(ProductRequestParameter param) {
        var comparator = getSortComparator(param);
        return productList.stream()
                .sorted(comparator)
                .toList();
    }

    public Product insert(Product product) {
        product.setId(generateId());
        productList.add(product);

        return product;
    }

    public void deleteAll() {
        productList.clear();
    }
}
@Configuration
public class RepositoryConfig {
@Bean
public IProductRepository productRepository(
@Value("${product-repository.storage}") String storageType
) {
if ("map".equalsIgnoreCase(storageType)) {
System.out.println("Create MapProductRepository.");
return new MapProductRepository();
} else if ("list".equalsIgnoreCase(storageType)) {
System.out.println("Create ListProductRepository.");
return new ListProductRepository();
} else {
throw new IllegalArgumentException("Provided product repository storage type is unsupported.");
}
}
}完成後,讀者可分別啟動 Spring Boot 和測試程式。從 Console 窗格中,能夠發現它們確實使用了不同實作方式的 repository。
雖然本文並未串接真實的資料庫,但讀者可理解成,正式環境與測試程式所用的 repository,並不會是同一個,已經分離開來了。
本文的完成後專案,請點我。