【Spring Boot】第8.2課-使用 Spring Data 存取 MongoDB 資料庫,進行基本 CRUD 操作
本文最後更新於:2025-03-22
準備好 MongoDB 的環境後,就能在 Spring Boot 中存取資料庫了。本文首先會展示要儲存的資料內容,接著介紹「Spring Data」框架的特色。
隨後透過「MongoRepository」內建的 CRUD 方法存取資料庫,而下一篇才會介紹自定義查詢條件的方式。
本文的練習用專案,請點我。
一、資料類別
以下是自定義的類別,叫做「Student」,用來描述學生資料。
@Document(collection = "student")
public class Student {

    @Id
    private String id;
    private String name;
    private int grade;
    private LocalDate birthday;
    private Contact contact;
    private List<Certificate> certificates;

    // getter, setter ...
}
這個類別冠上了 @Document 注解,代表它是資料庫中的「文件」。並透過 collection 參數,指定「集合」的名稱。參數請不要誤寫成「collation」了。
類別中包含 id、名字、年級、生日、聯繫方式與證照,共 6 個欄位。其中 id 欄位冠上了 @Id 注解,代表它在資料庫中對應到文件的主鍵欄位。
以下的「Contact」類別是描述聯繫方式,包含信箱與電話這 2 個欄位。
public class Contact {
    private String email;
    private String phone;

    public static Contact of(String email, String phone) {
        var c = new Contact();
        c.email = email;
        c.phone = phone;
        return c;
    }

    // getter, setter ...
}
以下的「Certificate」類別是描述證照,包含種類、分數與等級這 3 個欄位。
public class Certificate {
    private String type;
    private Integer score;
    private String level;

    public static Certificate of(String type, Integer score, String level) {
        var c = new Certificate();
        c.type = type;
        c.score = score;
        c.level = level;
        return c;
    }

    // getter, setter ...
}
本文會將 Student 類別的物件,儲存到 MongoDB 資料庫。
二、認識 Spring Data 框架
(一)建立 Repository 介面
如果讀者有用過 JDBC(Java Database Connectivity),應該對存取資料庫的程式流程還留有一點印象,大致包含以下步驟:
- 建立資料庫連線。
- 撰寫原生 SQL 語法。
- 將查詢結果(Result Set),轉換成商業邏輯要用的程式物件。
- 釋放資源。
由於太過繁瑣,於是「Spring Data」這套框架封裝了此過程,讓開發者能更輕鬆地存取資料庫。上一篇在 pom.xml 檔案中添加的「spring-boot-starter-data-mongodb」依賴,就是 Spring Data 的產品之一。
<dependency>
    <groupId>org.springframework.boot</groupId>
    <artifactId>spring-boot-starter-data-mongodb</artifactId>
</dependency>在第 5 課,我們有練習建立一個「ProductRepository」介面,將其注入到商業邏輯中。該介面有 2 種實作類別,分別用 List 與 Map 結構來儲存測試資料。
本節會建立一個特殊的介面,定位與上述的 ProductRepository 相同。但我們不必親自實作它,而是交給框架處理。
@Repository
public interface StudentRepository extends MongoRepository<Student, String> {
}
這個「StudentRepository」介面繼承了 MongoRepository 介面,且傳入兩個泛型類別,分別是文件與主鍵的類別。其中主鍵的類別,必須與上述 Student 資料類別中的 id 欄位相同。
(二)查詢語法與物件對映
使用 Spring Data 時,我們最直接感受到的好處,就是「產生查詢語法」與「物件對映」。
在 MongoRepository 介面,以及它的父介面中,已經有內建一些基本方法。舉例來說,我們可以將 Student 物件傳入 repository 的 insert 方法。
僅僅一句程式,Spring Data 就會產生如下的 MongoDB 操作:
db.student.insert(
    {
        "name": "Vincent",
        "grade": 2
        "contact": {
            "email": "vincent@school.com",
            "phone": "0911111111"
        }
    }
);
此時該方法會回傳插入成功的文件資料,且包含由 MongoDB 產生的 id。
又或者是呼叫 findById 方法,則會產生如下的操作:
db.student.find(
    {
        "_id": ObjectId("...")
    }
);
此時該方法除了回傳符合條件的結果,更重要的是文件資料會被轉換成 Java 物件,也就是 Student。
資料庫中的資料,與程式物件互相轉換,這項技術在關聯式資料庫稱為「物件關聯對映」(Object-Relational Mapping,ORM)。而在 MongoDB 則稱為「物件文件對映」(Object-Document Mapping,ODM)。
從上面這兩個例子,我們可看出 Spring Data 會解讀 repository 的方法定義,產生對應的資料庫語法。而在下一篇,讀者也能依照命名規則,設計出自己的查詢方法,讓操作更簡單。
三、使用 MongoRepository
本節讓我們來實際使用 MongoRepository 提供的內建方法。
為了在程式中有地方呼叫 StudentRepository,讀者可在 Controller 準備 API,屆時便能搭配如 Postman 之類的工具,對後端發送 request。
(一)插入資料
以下提供一支 API,用來建立學生資料。
@RestController
public class MyController {

    @Autowired
    private StudentRepository studentRepository;

    @PostMapping("/students")
    public ResponseEntity<Void> createStudent(@RequestBody Student student) {
        student.setId(null);
        studentRepository.insert(student);

        URI uri = ServletUriComponentsBuilder
                .fromCurrentRequestUri()
                .path("/{id}")
                .build(Map.of("id", student.getId()));

        return ResponseEntity.created(uri).build();
    }
}
呼叫 insert 方法即可插入資料。若該資料沒有 id 的值,則 MongoDB 將自行產生。若 id 發生重複,則會拋出 DuplicatedKeyException 例外。
該方法最後會回傳含有 id 的資料,此處組出 URI,附加到 response header,讓 API 回傳。
(二)取得資料
以下是查詢指定 id 的資料,呼叫 findById 方法即可。
@RestController
public class MyController {

    @Autowired
    private StudentRepository studentRepository;

    @GetMapping("/students/{id}")
    public ResponseEntity<Student> getStudent(@PathVariable String id) {
        Optional<Student> studentOp = studentRepository.findById(id);
        return studentOp.isPresent()
                ? ResponseEntity.ok(studentOp.get())
                : ResponseEntity.notFound().build();
    }
}
以下是給予 List,查詢多筆指定 id 的資料。呼叫 findAllById 方法即可。
@RestController
public class MyController {

    @Autowired
    private StudentRepository studentRepository;

    @GetMapping("/students/ids")
    public ResponseEntity<List<Student>> getStudents(@RequestParam List<String> idList) {
        List<Student> students = studentRepository.findAllById(idList);
        return ResponseEntity.ok(students);
    }
}
攜帶 query string 存取此 API 的方式,示意如下:
GET /students/ids?idList=111,222,333雖然在資料庫中,文件主鍵的欄位名稱為「_id」,且型態是 Object Id,但 MongoDB 會做這部份的轉換,所以讀者不用特別做處理。
(三)更新資料
以下是更新指定 id 的資料。
@RestController
public class MyController {

    @Autowired
    private StudentRepository studentRepository;

    @PutMapping("/students/{id}")
    public ResponseEntity<Void> updateStudent(
            @PathVariable String id, @RequestBody Student request
    ) {
        Optional<Student> studentOp = studentRepository.findById(id);
        if (studentOp.isEmpty()) {
            return ResponseEntity.notFound().build();
        }

        Student student = studentOp.get();
        student.setName(request.getName());
        student.setGrade(request.getGrade());
        student.setBirthday(request.getBirthday());
        student.setContact(request.getContact());
        student.setCertificates(request.getCertificates());
        studentRepository.save(student);

        return ResponseEntity.noContent().build();
    }
}
在邏輯中,我們先判斷該筆資料是否存在。是的話,就將 request 中的資料更新上去,最後呼叫 save 方法儲存。
這個 save 方法,其實是「upsert」的性質。也就是說,若 id 所對應的資料存在,便進行覆蓋,否則視為插入新資料。
(四)刪除資料
以下是刪除指定 id 的資料,呼叫 deleteById 方法即可。
@RestController
public class MyController {

    @Autowired
    private StudentRepository studentRepository;

    @DeleteMapping("/students/{id}")
    public ResponseEntity<Void> deleteStudent(@PathVariable String id) {
        studentRepository.deleteById(id);
        return ResponseEntity.noContent().build();
    }
}
四、測試資料
以下提供一支 API,用途是在資料庫插入 3 筆測試資料。若讀者有需要,可以先準備起來,方便下一篇的練習,
@RestController
public class MyController {

    @Autowired
    private StudentRepository studentRepository;

    @PostMapping("/students/reset")
    public ResponseEntity<Void> resetStudents() {
        Student s1 = new Student();
        s1.setName("Vincent");
        s1.setGrade(2);
        s1.setBirthday(LocalDate.of(1996, 1, 1));
        s1.setContact(Contact.of("vincent@school.com", "0911111111"));
        s1.setCertificates(List.of(
                Certificate.of("GEPT", null, "Medium"),
                Certificate.of("TOEIC", 990, "Gold")
        ));

        Student s2 = new Student();
        s2.setName("Dora");
        s2.setGrade(3);
        s2.setBirthday(LocalDate.of(1995, 1, 1));
        s2.setContact(Contact.of("dora@school.com", "0922222222"));
        s2.setCertificates(List.of(
                Certificate.of("TOEFL", 85, null),
                Certificate.of("TOEIC", 900, "Gold")
        ));

        Student s3 = new Student();
        s3.setName("Ivy");
        s3.setGrade(4);
        s3.setBirthday(LocalDate.of(1994, 1, 1));
        s3.setContact(Contact.of("ivy@school.com", "0933333333"));
        s3.setCertificates(List.of(
                Certificate.of("IELTS", 5, null)
        ));

        studentRepository.deleteAll();
        studentRepository.insert(List.of(s1, s2, s3));
        return ResponseEntity.noContent().build();
    }
}
此處會呼叫 deleteAll 方法,刪除 collection 中的所有資料。接著再呼叫另一個多載的 insert 方法,插入多筆資料。
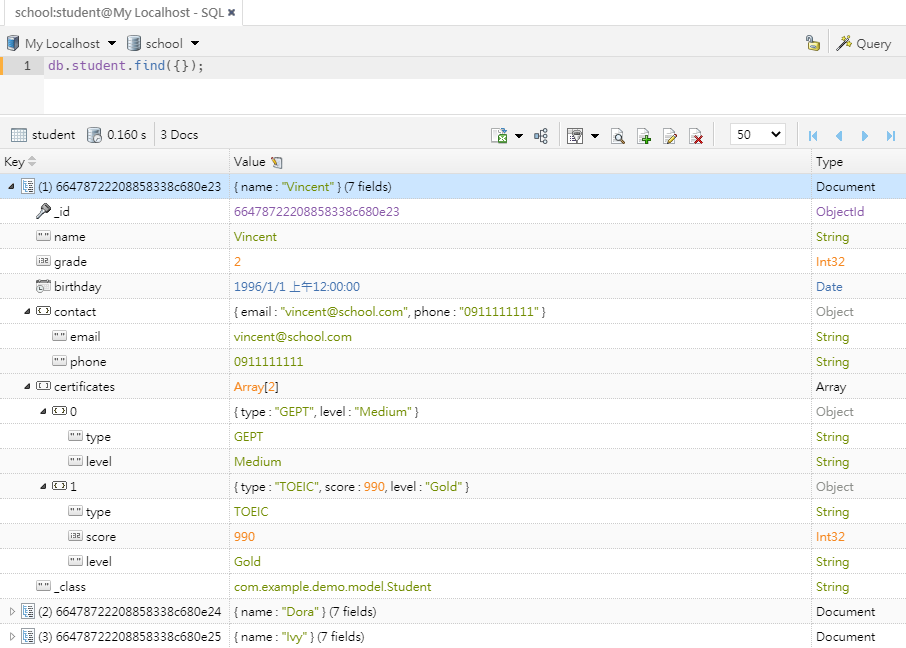
下圖是透過 GUI 工具「NoSQLBooster」查詢到的內容。
可確認到 MongoDB 會自動產生「_id」欄位,其型態為 Object Id。
到目前為止,都是使用 MongoRepository 內建的方法存取資料庫。下一篇將說明如何設計自己的查詢條件,以及排序方式。
本文的完成後專案,請點我。